How to hide a folder or how to create a hidden folder in Mac
Ever worried about hiding your personal stuffs on your Mac? This post is gonna bring shining in the eyes of the users who own a Mac but have to share it with others. I'm going to mention a cool trick about how to create a hidden folder and also how to hide a folder in Mac OS X. This can be done by using Terminal and it is really easy as the command is of just one small line. The basic concept working to hide a folder is to add a dot/period/point before the folder name will make it invisible, though it will remain at the same place. So here is the Terminal magic.
(A) How to create a hidden folder:
i. Go to Application and open Utilities.
ii. Launch Terminal.
iii. Now you have to go to the folder in which you want to create the folder.
iv. Command to enter a folder is cd foldername, e.g. cd Desktop.
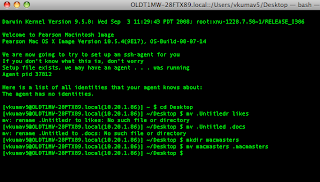
v. Once you enter the folder then create the hidden folder by the command mkdir .foldername e.g. mkdir .macmasters
vi. This will create a hidden folder that will not be seen by you so now you should make it visible so that you can add stuffs in it.
vii. Now type mv .macmasters macmasteres. Here mv is used to rename .macmasters (old folder name) to macmasters (new folder name). Now the folder will appear on the desired location and once you add stuffs in it you have to hide it again. For hiding the folder please follow steps mentioned in step B.
(B) How to hide an existing folder: The idea of using a dot/period/point before a folder to hide it will be used again.
i. Type mv macmasters .macmasters and your folder is hidden once again.
Make sure that you don't forget the folder name when you hide it as there is no source for novices to see the hidden folder.
Ever worried about hiding your personal stuffs on your Mac? This post is gonna bring shining in the eyes of the users who own a Mac but have to share it with others. I'm going to mention a cool trick about how to create a hidden folder and also how to hide a folder in Mac OS X. This can be done by using Terminal and it is really easy as the command is of just one small line. The basic concept working to hide a folder is to add a dot/period/point before the folder name will make it invisible, though it will remain at the same place. So here is the Terminal magic.
(A) How to create a hidden folder:
i. Go to Application and open Utilities.
ii. Launch Terminal.
iii. Now you have to go to the folder in which you want to create the folder.
iv. Command to enter a folder is cd foldername, e.g. cd Desktop.
v. Once you enter the folder then create the hidden folder by the command mkdir .foldername e.g. mkdir .macmasters
vi. This will create a hidden folder that will not be seen by you so now you should make it visible so that you can add stuffs in it.
vii. Now type mv .macmasters macmasteres. Here mv is used to rename .macmasters (old folder name) to macmasters (new folder name). Now the folder will appear on the desired location and once you add stuffs in it you have to hide it again. For hiding the folder please follow steps mentioned in step B.

(B) How to hide an existing folder: The idea of using a dot/period/point before a folder to hide it will be used again.
i. Type mv macmasters .macmasters and your folder is hidden once again.
Make sure that you don't forget the folder name when you hide it as there is no source for novices to see the hidden folder.
Comments