How to take screen shot in Mac
The idea of writing this post came in my mind when I asked one of colleague to send me a screen shot of an application in Mac as I was out of office. She was unable to do it till I guided her how to do it as she has been a Windows user and was very used to PrintScreen button. The main problem is that there no inbuilt key on the Apple keyboard but Apple have included two ways of taking screen shots.
The first way is to use the Grab tool in Utilities. Once you launch this utility you'll find few options in the menu bar.
 If you expand the Capture menu there are four sub-menus namely Selection, Window, Screen and Timed Screen.
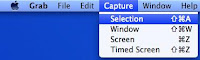
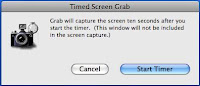
The fourth option Timed Screen is really wonderful which gives you a option to take a screen shot after 10secs. This could really be beneficial when the mouse is busy and you need to take a print screen of Mac when mouse is busy.
Another method of taking picture is pressing those three buttons in combination Command + Shift + 3. This takes a screen shot of your whole screen of your Mac and saves it in the form of .png file. This is an image file, and is saved as Picture 1.png and is created & saved in sequential order i.e. Picture 2.png, Picture 3.png and so on.
If you want selected area to pe taken as a screen shot then press Command + Shift + 4 and pressing this key command gives a small marquee style cursor to select the area you want to capture.
Some additional commands:
If you press the space bar after pressing the key command (Command + Shift + 4 ) and before you drag a box, you get a small camera. This is very useful as it will automatically crop and image and only take a picture of the window or menu you select.
You can also press control while dragging your selection cursor . This will instead of creating a file on your desktop, copy the image to the clipboard that you can use directly to paste anywhere.
If shift is pressed it locks the vertical height of the selection cursor .
If you hold down space after you make a selection, before releasing the mouse, you can move your selection around the screen.
If you press option and drag your selection cursor it will create the marquee from where first clicked. If you want to close it, just press escape.
Now capture the screen te way you want.
The first way is to use the Grab
 tool in Utilities. Once you launch this utility you'll find few options in the menu bar.
 If you expand the Capture menu there are four sub-menus namely Selection, Window, Screen and Timed Screen.
The fourth option Timed Screen is really wonderful which gives you a option to take a screen shot after 10secs. This could really be beneficial when the mouse is busy and you need to take a print screen of Mac when mouse is busy.

Another method of taking picture is pressing those three buttons in combination Command + Shift + 3. This takes a screen shot of your whole screen of your Mac and saves it in the form of .png file. This is an image file, and is saved as Picture 1.png and is created & saved in sequential order i.e. Picture 2.png, Picture 3.png and so on.
If you want selected area to pe taken as a screen shot then press Command + Shift + 4 and pressing this key command gives a small marquee style cursor to select the area you want to capture.
Some additional commands:
If you press the space bar after pressing the key command (Command + Shift + 4 ) and before you drag a box, you get a small camera. This is very useful as it will automatically crop and image and only take a picture of the window or menu you select.
You can also press control while dragging your selection cursor . This will instead of creating a file on your desktop, copy the image to the clipboard that you can use directly to paste anywhere.
If shift is pressed it locks the vertical height of the selection cursor .
If you hold down space after you make a selection, before releasing the mouse, you can move your selection around the screen.
If you press option and drag your selection cursor it will create the marquee from where first clicked. If you want to close it, just press escape.
Now capture the screen te way you want.
Comments
Resolution Pixels 1280x800
Backlight Type 1 CCFL
Aspect Ratio 16:9
Screen Surface Glossy
Data Connection 20-Pin
Application Laptop or Notebook
http://www.nbkit.com/Wholesale/product/New-AUO-B121EW01-V.2-LCD-screen-12.1-inch-1CCFL-1280x800-WXGA_c17774.html
AUO B121EW01 V.2 LCD screen LCD screen is the most important component of laptop.Maybe Other laptop parts or components could be replaced or repaired easily at low cost.but for LCD screen,in most cases it only can't be compatible problem. For solve the following problem,broken lcd screen,bad pixels,white lines,color,shine screen.Replace A LCD screen is only solution.Sometime,you need to make sure anti-static steps prepared before remove old screens and check new lcd screen parameters match your original LCD screen. so sugguest buyers need buy it at professional laptop screen website.
The LCD screen review from NBkit.com
12.1" LCD Screen has been experienced great changes from year 2005 to now. XGA--SXGA+--WXGA--WXGA HD, 5 Kinds different resolution, 5 kinds diffent data connector, plus backlight and slim or not, really rich in changes. Honesly every DIY buyer should note this before any replace screen action. Nbkit.com do a leading steps , and list their LCD screen connector type ,pins quantity to make sure every buyer get a useful support. Let"s see the tables, size backlight pins resolution Thickness 12.1" 1 CCFL 20 1280x768 WXGA standard 12.1" 1 CCFL 20 1024x768 XGA standard 12.1" 1 CCFL 30 1024x768 XGA standard 12.1" LED 30small 1024x768 XGA Slim 12.1" 1 CCFL 20 1280x800 WXGA standard 12.1" LED 30small 1280x800 WXGA Slim 12.1" LED 40 1280x800 WXGA Slim 12.1" LED 40small 1280x800 WXGA Slim 12.1" LED 20 1280x800 WXGA standard 12.1" LED 30 1280x800 WXGA standard 12.1" LED 30small 1280x800 WXGA standard 12.1" LED 40 1280x800 WXGA standard 12.1" LED 40small 1280x800 WXGA standard 12.1" 1 CCFL 20 1400x1050 SXGA+ standard 12.1" 1 CCFL 30 1400x1050SXGA+ standard 12.1" LED 40small 1440x900 WXGA+ standard 12.1" LED 30 1366x768 WXGA HD standard 12.1" LED 40 1366x768 WXGA HD standard